
Index Analysis
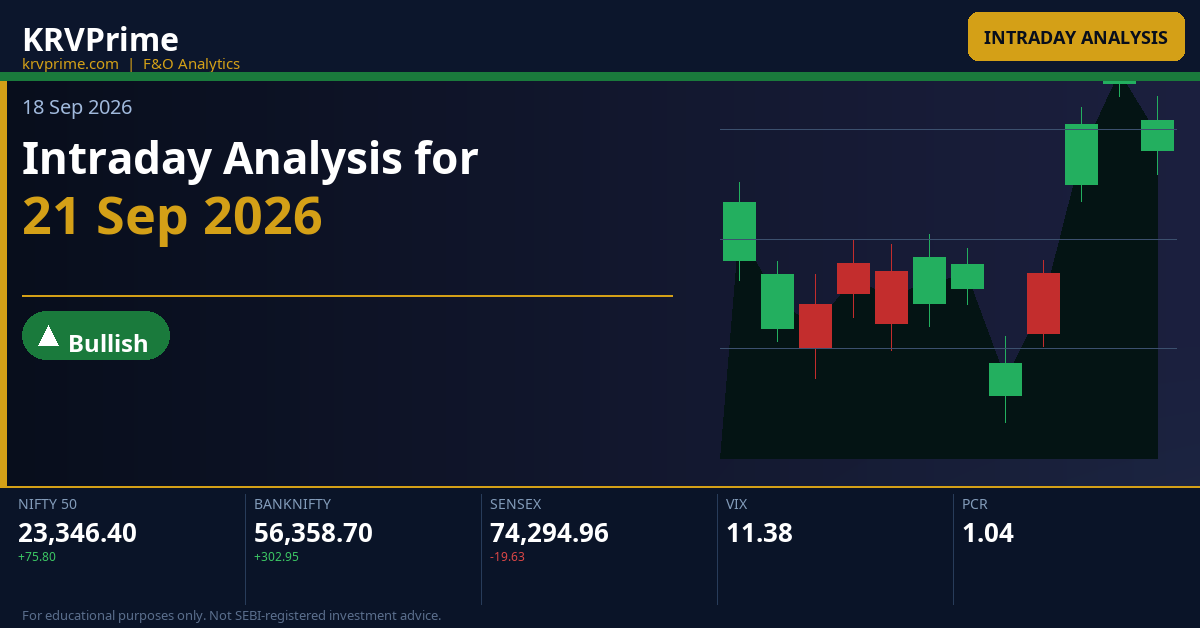
Intraday Analysis for 21 Sep 2026
KRV Prime18 September 202652 min
Educational/Derived AnalysisSource: KRV Prime Market Insights (End-of-Day)As of 18 Sep 2026, 05:02 PM IST
Intraday Analysis for 21 Sep 2026
Markets closed on a mildly positive note on 18 Sep 2026, with NIFTY gaining 0.33% to close at 23,346.40, BANKNIFTY advancing 0.54% to 56,358.70, and SENSEX marginally lower at 74,294.96. India VIX data is unavailable for this session, which makes it critical to rely on CPR structure, OI walls, and straddle pricing for range estimation — traders should treat the implied move from straddle premiums as the primary volatility guide. The NIFTY weekly straddle of 172.7 points defines a tight expected band of roughly 23,174 to 23,523, suggesting option sellers are comfortable with a narrow range into the weekly expiry on 22 Sep 2026.
Key Market Signals — Intraday Setup
All three indices are trading below their respective weekly and monthly CPR bands, a structurally bearish alignment that places the burden of proof on bulls to reclaim those broader pivot zones. NIFTY's ascending narrow daily CPR offers the best near-term trending opportunity, while SENSEX's overlapping medium CPR and proximity to the OI resistance wall at 74,500 create a compressed, high-risk setup for Monday's session.
Deep Technical Analysis & Levels
NIFTY
Ascending — Narrow (Width 0.02%)
▲ Bullish
Market Structure Trending (up or down trend) | Straddle ATM 23,350 straddle priced at 172.7 points (Call 88.05 + Put 84.65), implying an expected intraday move of approximately ±172 points from ATM, defining a range of roughly 23,178 to 23,523 for the weekly expiry session on 22 Sep 2026. Given this is the day before weekly expiry, theta decay will be aggressive and premium sellers hold the structural edge unless a breakout beyond the straddle range is triggered. | Max Pain Weekly max pain at 23,350 — precisely at the ATM strike — signals that option sellers are positioned to pin the index near current levels into the 22 Sep expiry. This is a high-conviction anchor; a flat or minor-gap open that keeps NIFTY near 23,346–23,350 is the optimal zone for short straddle writers, and any directional breakout will be fiercely contested by gamma sellers. |
Tomorrow's Complete Level Map
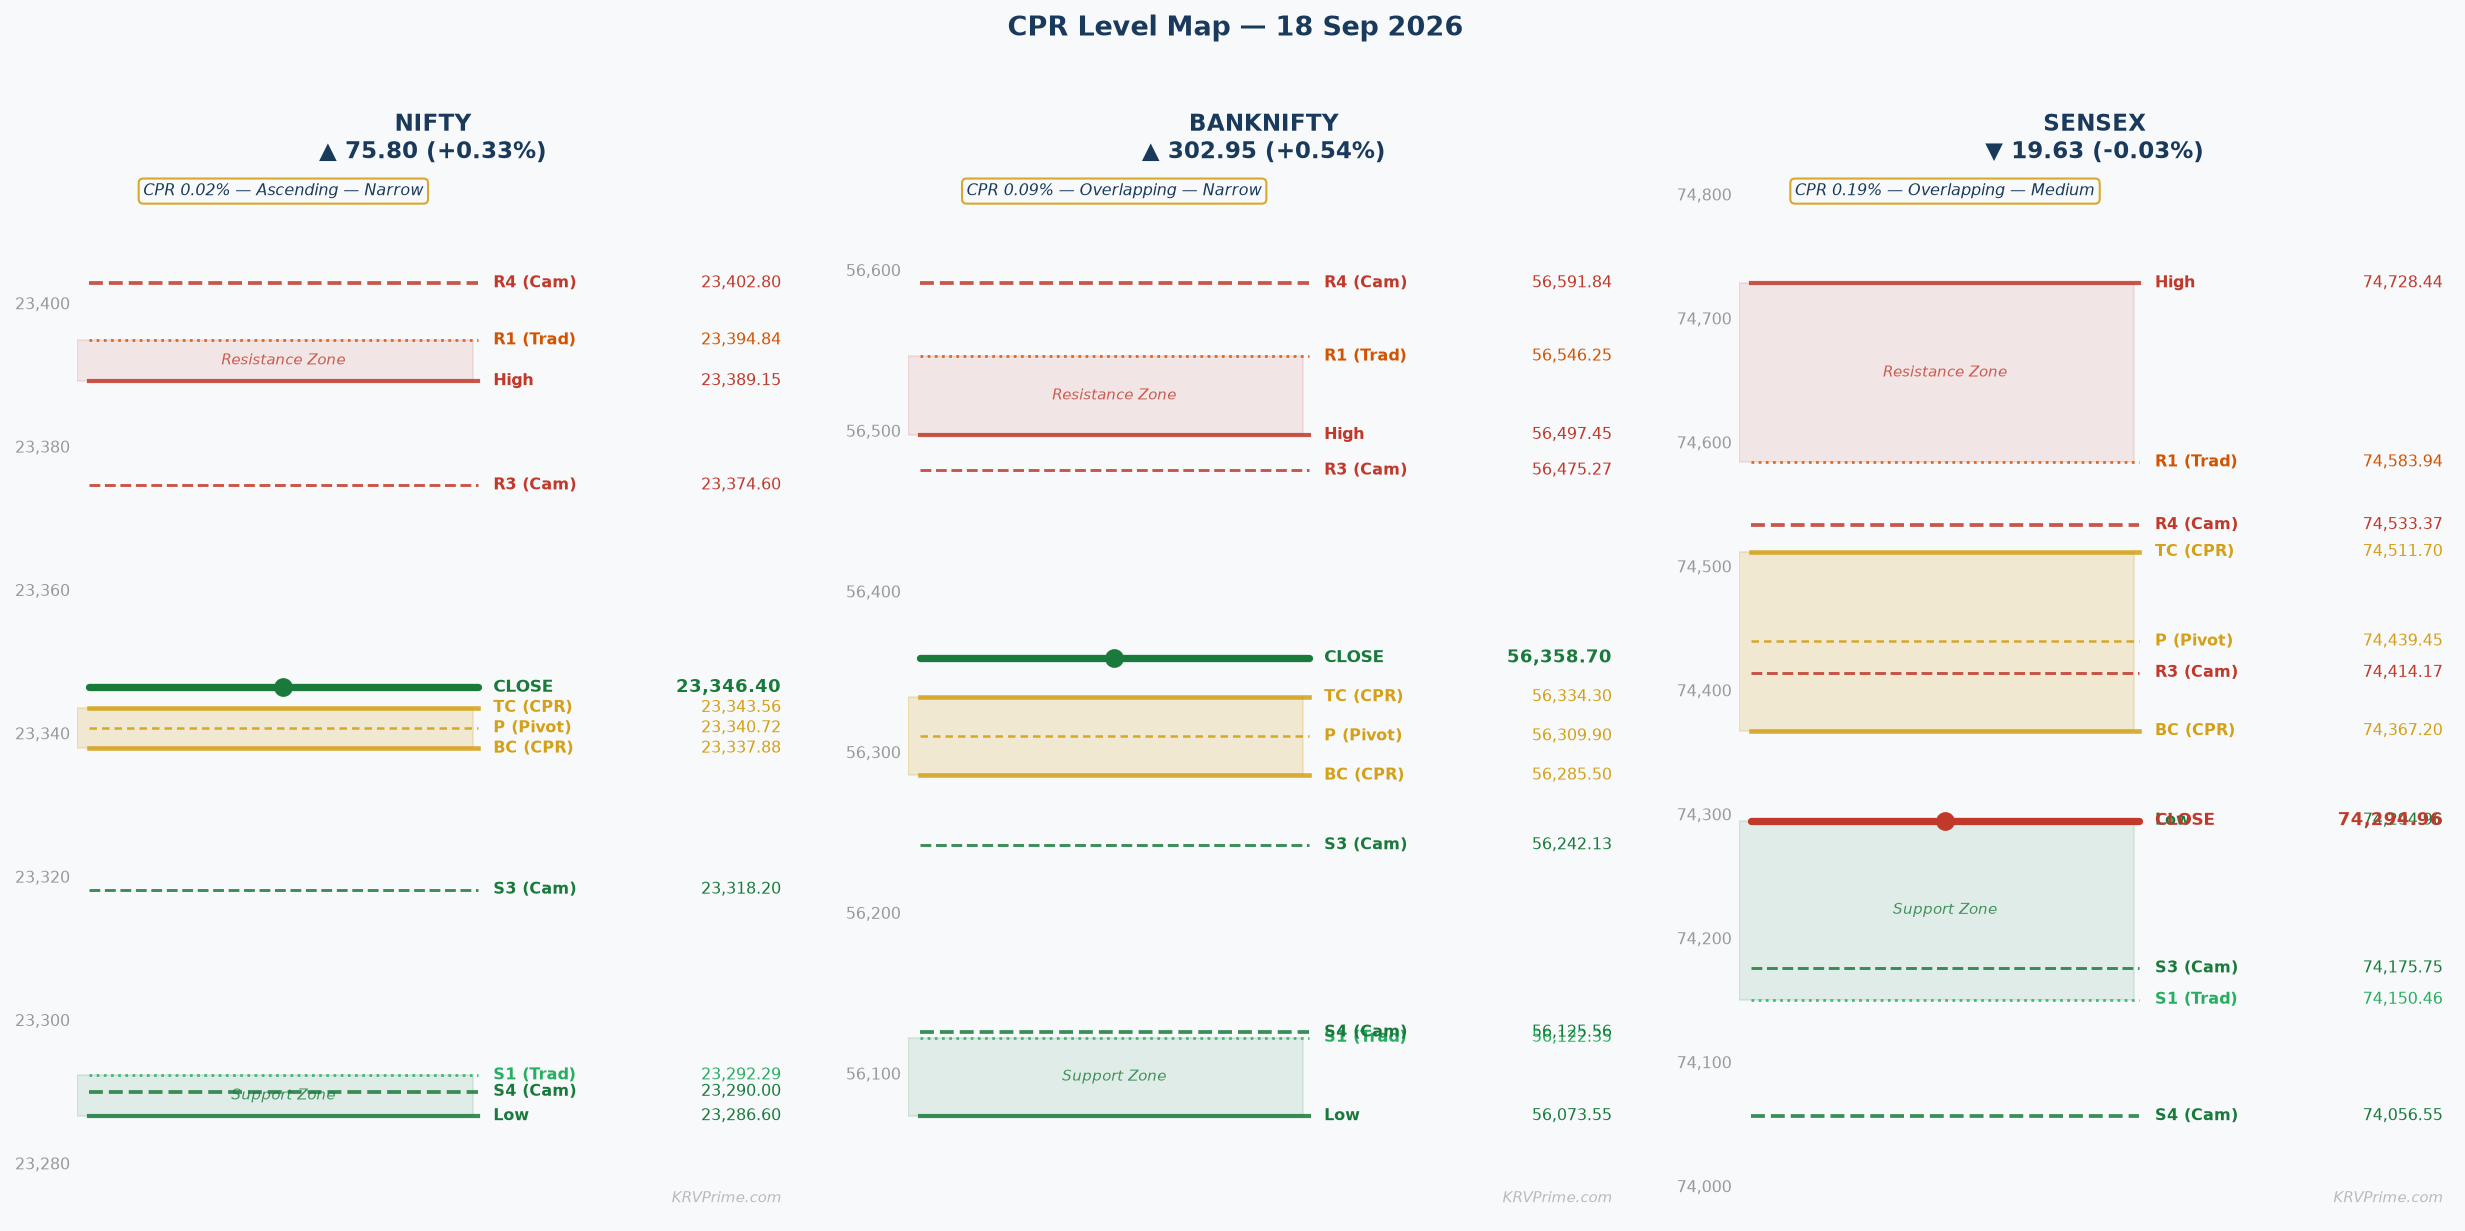
OI-R: 24,000 R3: 23,497.39 H6: 23,449.21 H5: 23,435.74 R2: 23,443.27 H4 ▶: 23,402.80 R1: 23,394.84 PDH: 23,389.15 H3 ↩: 23,374.60
TC: 23,343.56 P: 23,340.72 BC: 23,337.88
L3 ↩: 23,318.20 PDL: 23,286.60 S1: 23,292.29 L4 ▶: 23,290.00 S2: 23,238.17 L5: 23,257.06 L6: 23,243.59 S3: 23,189.74 OI-S: 23,300
↩ = Camarilla reversal point | ▶ = Camarilla breakout/breakdown trigger | OI-R/OI-S = Options wall (CE/PE max OI)
▲ Higher Open (Gap Up) — Open > Prev Close
▲ Bullish
Open lands: With an Ascending Narrow CPR where BC is 23,337.88 and TC is 23,343.56, a gap-up open above the previous close of 23,346.40 immediately places price inside or above the CPR band. A minor gap up of 0.05–0.25% would open in the range of 23,358–23,404, which is above TC (23,343.56) and into the H3–R1 zone. A significant or large gap would thrust price above PDH (23,389.15) and into or beyond R1 (23,394.84).
CPR role: Launch pad — the CPR band (BC 23,337.88 to TC 23,343.56) transforms into immediate support on a gap-up open. Since the ascending CPR has already shifted above the previous close, any pullback toward the TC at 23,343.56 or BC at 23,337.88 should be treated as a buy-the-dip opportunity rather than a breakdown signal, making the CPR band a high-conviction demand zone for the session.
Minor Gap (0.05–0.25%) — Structure Dominant
A minor gap up of 0.05–0.25% would open NIFTY in the 23,358–23,404 range, placing price comfortably above TC (23,343.56) and inside the H3–R1 corridor. The ascending narrow CPR structure powerfully reinforces this gap because the entire CPR band is already positioned above the previous close, meaning any gap-up open is structurally endorsed — there is no overhead CPR resistance to fight through. The first actionable target after a minor gap up is H3 at 23,374.60, followed by PDH at 23,389.15 and then R1 at 23,394.84, all of which should be approached with partial profit-taking in mind given the straddle range ceiling near 23,523.
Significant Gap (0.25–0.5%) — Balanced
A significant gap up of 0.25–0.5% would open NIFTY near 23,404–23,463, directly at or above the H4 Camarilla breakout trigger at 23,402.80 and potentially into R2 territory at 23,443.27. At this opening level, gap-fill risk toward TC (23,343.56) becomes a real possibility in the first 30 minutes, as late sellers and premium decay from option writers will create selling pressure — traders should NOT initiate fresh longs at the open but wait for a 30-minute hold above H4 (23,402.80) before adding. A confirmed 30-minute close above H4 (23,402.80) opens the path to H5 (23,435.74), R2 (23,443.27), and H6 (23,449.21), while failure below H3 (23,374.60) restores gap-fill risk toward the CPR band.
Large Gap (>0.5%) — Gap Direction Dominant
A large gap up exceeding 0.5% would open NIFTY above 23,463, thrusting price into R2 (23,443.27) or above, and placing it well outside the straddle's expected range — a structurally aggressive opening that invites immediate fade from options sellers defending the upper boundary. At this level, the probability of a gap-fill toward H3 (23,374.60) or even TC (23,343.56) is elevated within the first hour, and the dominant trade is to fade the opening spike with a stop above the opening candle high rather than chase. However, if NIFTY can sustain two consecutive 30-minute closes above R2 (23,443.27), the momentum target extends to R3 (23,497.39), with OI resistance at 24,000 remaining a distant but structural ceiling well beyond the straddle range.
|
▲ Upside Path → OI-R From TC (23,343.56), the upside path progresses to H3 (23,374.60) as the first Camarilla mean-reversion stall zone where partial profits should be booked, then PDH (23,389.15) as a natural prior session resistance, followed by H4 (23,402.80) as the Camarilla breakout trigger that, once cleared, opens R1 (23,394.84), H5 (23,435.74), R2 (23,443.27), and H6 (23,449.21) in the upper zone. Volume confirmation is essential at each Camarilla level — a breakout above H4 (23,402.80) on above-average volume is the strongest signal that bulls are in full control, otherwise the move likely stalls and retests the CPR band. |
▼ Downside Path → OI-S If NIFTY fails to hold TC (23,343.56) after a gap-up open, the failure path routes price back toward P (23,340.72), then BC (23,337.88), and finally L3 (23,318.20) — each level representing a progressively more bearish admission. A close below BC (23,337.88) on the first 15-minute candle would be a sharp reversal signal, indicating gap-up was a bull trap, and the session target flips to L3 (23,318.20), then PDL (23,286.60) and OI support at 23,300, which coincide closely and form a critical double-support cluster that defines the session's downside anchor. |
| 🔴 OI-R: OI resistance at 24,000 (highest CE open interest strike for the week) is a distant but powerful structural ceiling — on a gap-up day, it functions as the maximum bull aspiration level for the weekly series but is 654 points above Friday's close, making it unreachable in a single intraday session without an extraordinary catalyst. CE writers at the 24,000 strike are deeply comfortable with their positions even on a gap-up day, and their gamma-selling activity will suppress any rally well before that level — the real intraday OI ceiling is effectively H4 (23,402.80) to R1 (23,394.84), where fresh call writing typically concentrates. | 🟢 OI-S: OI support at 23,300 (highest PE open interest strike for the week) sits just above PDL (23,286.60) and extremely close to L4 (23,290.00), creating an extraordinary triple confluence support zone that PE writers are actively defending. On a gap-up day, this zone is largely irrelevant unless a severe reversal unfolds — it serves as the ultimate abort level for any long position initiated on the gap-up, and a breach below 23,300 would trigger PE premium collapse and stop-loss cascades from bulls who bought expecting the ascending CPR trend. |
⚡ Key Trigger: The primary trigger for a sustained gap-up bull run is a first 15-minute candle close above TC (23,343.56) holding into the second candle — since CPR is Narrow at 0.02%, the first 15-minute candle is the definitive directional signal and there is no ambiguity. A clean hold above TC (23,343.56) with the open already above it confirms the ascending structure is active, giving bulls the green light to target H3 (23,374.60), PDH (23,389.15), and R1 (23,394.84) in sequence, while a pull-back close below TC on the first candle signals profit-taking from gap-traders and mandates waiting for BC (23,337.88) re-support.
▼ Lower Open (Gap Down) — Open < Prev Close
▼ Bearish
Open lands: With an Ascending CPR where BC is 23,337.88 and TC is 23,343.56 — both positioned above the previous close of 23,346.40 in the ascending structure — a gap-down open below 23,346.40 places price below the entire CPR band, which is the structurally bearish scenario for an ascending CPR type. A minor gap down opens near 23,322–23,346, placing price between OI support (23,300) and BC (23,337.88); a significant gap down opens near 23,230–23,288, testing S1/L4; a large gap down breaches PDL (23,286.60).
CPR role: Overhead resistance — on a gap-down open below an ascending CPR, the entire band from BC (23,337.88) to TC (23,343.56) acts as overhead resistance. Bulls must reclaim BC first, then P (23,340.72), then TC (23,343.56) to restore the bullish ascending structure; failure to do so within 30 minutes confirms bears have taken control of the session and the CPR band becomes a sell-the-rally zone.
Minor Gap (0.05–0.25%) — Structure Dominant
A minor gap down of 0.05–0.25% opens NIFTY in the 23,288–23,334 range, placing price below BC (23,337.88) but above OI support at 23,300 and near L3 (23,318.20) — a compressed zone where the gap-fill probability is high within the first 30–60 minutes given the ascending CPR structure's gravitational pull. The Narrow CPR width of 0.02% means any move back toward BC (23,337.88) will be rapid and should be watched on the first 15-minute candle close — a reclaim of BC in the first candle restores the bull thesis and targets TC (23,343.56) and then H3 (23,374.60). If BC (23,337.88) resists recovery, L3 (23,318.20) becomes the first bear target, with OI support at 23,300 and S1 (23,292.29) forming a critical cluster just below.
Significant Gap (0.25–0.5%) — Balanced
A significant gap down of 0.25–0.5% opens NIFTY near 23,229–23,288, pushing price into the S1 (23,292.29) and L4 (23,290.00) zone — a dual Camarilla and Traditional breakdown trigger that, if it holds, represents a failure-and-resume bearish pattern. At this opening level, the ascending CPR structure is severely compromised, and the 30-minute reclaim rule applies: bulls must see a 30-minute close back above BC (23,337.88) to restore any intraday bullish hope, otherwise the path to L5 (23,257.06) and S2 (23,238.17) opens. The OI support at 23,300, sitting between the opening price and BC (23,337.88), acts as the first recovery checkpoint — PUT writers at this strike will defend aggressively, making the 23,285–23,300 zone a high-conviction battle ground.
Large Gap (>0.5%) — Gap Direction Dominant
A large gap down exceeding 0.5% opens NIFTY below 23,229, breaching PDL (23,286.60), S1 (23,292.29), L4 (23,290.00), and OI support (23,300) simultaneously — a structurally devastating opening that signals panic selling and potential forced liquidations. The straddle of 172.7 points from ATM 23,350 places the lower boundary near 23,177, and a large gap open near or below that level means the straddle has already been monetised by bears, making fresh put-buying expensive while creating a potential recovery setup for mean-reversion traders. The emergency recovery levels are L5 (23,257.06) and L6 (23,243.59) on the Camarilla downside, while S2 (23,238.17) and S3 (23,189.74) represent the Traditional bear targets — two consecutive 30-minute closes below L4 (23,290.00) confirm the large-gap bear extension.
|
▲ Upside Path → OI-R The bull recovery path on a gap-down starts at BC (23,337.88) — the first level that must be reclaimed — then P (23,340.72) as the pivot midpoint, followed by TC (23,343.56) which would restore the ascending CPR's bullish structural role, and then H3 (23,374.60) as the first Camarilla target. Genuine recovery is confirmed only when a 15-minute candle closes above TC (23,343.56) with rising volume, distinguishing it from a dead-cat bounce that fades at P (23,340.72) — without this volume confirmation, every bounce toward BC should be treated as a short-selling opportunity. |
▼ Downside Path → OI-S The bear extension path runs from the opening below BC (23,337.88) through L3 (23,318.20) — the first Camarilla mean-reversion stall zone that may provide a brief bounce — and then through OI support at 23,300 and L4 (23,290.00), which together form the most critical bear confirmation cluster. A 15-minute close below L4 (23,290.00) and OI support (23,300) triggers stop-loss cascades from PUT writers and directional traders, accelerating the move toward L5 (23,257.06), S2 (23,238.17), and L6 (23,243.59) as the terminal bear targets for the session. |
| 🔴 OI-R: OI resistance at 24,000 is entirely irrelevant on a gap-down day — it sits 654+ points above the expected trading range and CE writers at that strike are indifferent to intraday price action near 23,300. The more relevant OI dynamic on the downside is the concentration of fresh CE writing near the 23,400–23,500 zone that will cap any recovery rally, ensuring even a successful gap-fill attempt struggles to push significantly above TC (23,343.56) without exceptional buying volume. | 🟢 OI-S: OI support at 23,300 (highest PE open interest) is the PRIMARY defensive line for a gap-down session — PE writers at this strike have a massive vested interest in preventing a sustained close below 23,300, and their delta-hedging activity will create aggressive buying near this level. However, if OI support at 23,300 is convincingly breached with high volume, it triggers a structural capitulation — PE writers begin unwinding hedges, amplifying the downward move toward S1 (23,292.29), PDL (23,286.60), and L4 (23,290.00) in rapid succession. |
⚡ Key Trigger: The critical trigger for a gap-down session is whether NIFTY can reclaim BC (23,337.88) within the first 30 minutes on a 30-minute candle close — a reclaim of BC signals gap-fill intent and targets TC (23,343.56), P (23,340.72), and then H3 (23,374.60) as the bull recovery path. Failure to reclaim BC (23,337.88) within 30 minutes confirms the ascending CPR has flipped to overhead resistance for the session, locking in bearish control and directing price toward L3 (23,318.20), OI support (23,300), L4 (23,290.00), and S1 (23,292.29) as sequential bear targets.
◆ Near Flat Open — Open ≈ Prev Close (±0.05%)
◆ Neutral
Open lands: A flat open within ±0.05% of the previous close of 23,346.40 places NIFTY in the 23,334–23,358 range. For an Ascending CPR where BC is 23,337.88, P is 23,340.72, and TC is 23,343.56, a flat open near 23,346 places price just above TC (23,343.56) — technically inside the CPR band or marginally above it. This is the most powerful setup for the ascending narrow CPR, as price opening near BC on an ascending structure means the entire CPR acts as a support platform below the open.
CPR role: Decision zone and launch pad — with a flat open just above TC (23,343.56), the CPR band functions as an immediate demand zone with BC (23,337.88) as the structural floor. The Narrow width of 0.02% (just 5.68 points wide) means this is an extreme compression setup where a single decisive 15-minute candle will set the entire session's direction — flat opens in Narrow Ascending CPRs are the textbook trending-day setup.
Near Flat (±0.05%)
A flat open in a Narrow Ascending CPR is the highest-probability setup for a trending day — the CPR band spans only 5.68 points (BC 23,337.88 to TC 23,343.56), and a flat open near 23,346 places price fractionally above TC, making this a near-perfect compressed launch scenario. The first 15-minute candle IS the trade: a close above TC (23,343.56) with price holding above the band confirms ascending structure activation and triggers an immediate bull momentum move toward H3 (23,374.60) and PDH (23,389.15), while a close below BC (23,337.88) signals the ascending CPR has failed as support and routes price toward L3 (23,318.20) and OI support at 23,300. At 0.02% width, this is the narrowest possible CPR configuration — statistically, narrow ascending CPRs precede trending days with higher than 70% probability, meaning intraday range-trading strategies are counter-productive and directional positions with trailing stops are the optimal approach. Both bull and bear triggers must be respected with equal discipline: bull trigger is a first 15-minute close above TC (23,343.56) targeting H3 (23,374.60), R1 (23,394.84), and H4 (23,402.80); bear trigger is a first 15-minute close below BC (23,337.88) targeting L3 (23,318.20), OI support (23,300), and L4 (23,290.00) — and given the proximity of max pain at 23,350 to the current price, the flat-open scenario is the most likely Monday opening scenario going into Tuesday's weekly expiry.
|
▲ Upside Path → OI-R From a first 15-minute close above TC (23,343.56), the upside path progresses to H3 (23,374.60) as the Camarilla mean-reversion first stall zone where 30–40% of position profits should be taken, then PDH (23,389.15) as the prior session high that will attract selling from traders who missed Friday's high, followed by R1 (23,394.84) and H4 (23,402.80) as the dual Traditional and Camarilla breakout triggers. Volume must expand progressively at each level — stagnant volume at H3 (23,374.60) is a signal to exit fully rather than trail, while expanding volume through PDH (23,389.15) targets H5 (23,435.74) and the OI resistance ceiling at 24,000 which is the ultimate but distant bull aspiration. |
▼ Downside Path → OI-S A first 15-minute close below BC (23,337.88) activates the downside path through L3 (23,318.20) — the Camarilla mean-reversion bear zone where shorts should take 30% profits — then through OI support at 23,300 and S1 (23,292.29) and L4 (23,290.00), which form an extraordinary quad-confluence support cluster. A break below this 23,290–23,300 cluster would be a genuine trending breakdown signal targeting L5 (23,257.06), S2 (23,238.17), and L6 (23,243.59), with the straddle's lower boundary near 23,178 providing context for how far option market makers expect the downside can extend. |
| 🔴 OI-R: OI resistance at 24,000 (highest CE OI for the week) is the structural ceiling that CE writers at the 24,000 strike are defending by continuously writing calls — on a flat-open day trading near 23,346, this resistance is 654 points away and acts as a psychological anchor that keeps bulls cautious about overextending. The practical implication for a flat-open scenario is that CE writing activity at near-term strikes (23,400–23,450) will be the actual short-term ceiling, and the 24,000 OI wall ensures there is no possibility of a blow-off top until that wall is meaningfully eroded. | 🟢 OI-S: OI support at 23,300 (highest PE OI for the week) sits just 46 points below the current close and is the most critical level for the flat-open scenario — PE writers at 23,300 are aggressively defending this strike as expiry approaches on 22 Sep, making it a near-impenetrable floor in the absence of a systemic shock. On a flat-open day where NIFTY is anchored near max pain (23,350), the 23,300 PE OI wall creates a natural downside buffer that makes sub-23,300 moves extremely unlikely without extraordinary negative news, effectively defining the real downside risk as just 46–50 points from the open. |
⚡ Key Trigger: Bull trigger: first 15-minute candle close above TC (23,343.56) with above-average volume confirms ascending CPR activation and targets H3 (23,374.60) as the first milestone; Bear trigger: first 15-minute candle close below BC (23,337.88) nullifies the ascending structure and confirms bearish control targeting L3 (23,318.20). The 5.68-point gap between BC and TC is the structural fulcrum for the entire session — given the weekly expiry on 22 Sep and max pain anchored at 23,350 (exactly where price sits), options sellers will contest every directional move aggressively, making the first candle's close relative to TC/BC the only reliable signal worth trading.
BANKNIFTY
Overlapping — Narrow (Width 0.09%)
▲ Bullish
Market Structure Trending (up or down trend) | Straddle ATM 56,400 monthly straddle priced at 946 points (Call 532.85 + Put 413.15), implying an expected move of approximately ±946 points from ATM, defining a broad intraday range of roughly 55,454 to 57,346. The asymmetric premium (calls more expensive than puts by 119.70 points) reflects a mild upside bias in options pricing, while the wide straddle range suggests BANKNIFTY has room for significant intraday swings — premium sellers should expect active gamma management throughout the session. | Max Pain Monthly max pain at 57,200 sits 841 points above Friday's close of 56,358.70 — a substantial gap that creates a gravitational pull toward higher levels as the 29 Sep expiry approaches. This max pain level suggests option sellers are positioned for BANKNIFTY to drift higher over the coming sessions, and any rally toward 56,700–57,000 this week would be in alignment with max pain mechanics. |
Tomorrow's Complete Level Map
OI-R: 58,000 R3: 56,970.15 H6: 56,784.76 H5: 56,727.99 R2: 56,733.80 H4 ▶: 56,591.84 R1: 56,546.25 PDH: 56,497.45 H3 ↩: 56,475.27
TC: 56,334.30 P: 56,309.90 BC: 56,285.50
L3 ↩: 56,242.13 PDL: 56,073.55 S1: 56,122.35 L4 ▶: 56,125.56 S2: 55,886.00 L5: 55,989.41 L6: 55,932.64 S3: 55,698.45 OI-S: 54,000
↩ = Camarilla reversal point | ▶ = Camarilla breakout/breakdown trigger | OI-R/OI-S = Options wall (CE/PE max OI)
▲ Higher Open (Gap Up) — Open > Prev Close
▲ Bullish
Open lands: BANKNIFTY's Overlapping Narrow CPR has BC at 56,285.50 and TC at 56,334.30, while the previous close was 56,358.70 — meaning the previous close is already above TC. A gap-up open above 56,358.70 places BANKNIFTY above TC and into the H3 zone (56,475.27) or beyond, representing a continuation of the existing above-CPR bullish position. The Overlapping structure means partial overlap with the previous session's range, and an open above TC (56,334.30) confirms bulls are sustaining multi-session momentum.
CPR role: Launch pad and support base — since the previous close was already above TC (56,334.30), a gap-up open further above TC confirms that the CPR band is acting as a well-established support below the current price. The entire band from BC (56,285.50) to TC (56,334.30) functions as a demand zone where any intraday pullback should find buyers, and the Narrow width (0.09%) ensures this support is compact and decisive.
Minor Gap (0.05–0.25%) — Structure Dominant
A minor gap up of 0.05–0.25% opens BANKNIFTY in the 56,387–56,500 range, placing price between TC (56,334.30) and H3 (56,475.27) or at PDH (56,497.45) — a structurally strong opening that keeps the bullish trend intact. The Overlapping Narrow CPR reinforces this gap because the previous close was already above TC, meaning two consecutive sessions above the CPR band signal sustained upward trending behaviour consistent with the 'Trending' market structure designation. The first 15-minute candle close above TC (56,334.30) is the minimum requirement for bull confirmation, with H3 (56,475.27) and PDH (56,497.45) as the immediate targets, followed by R1 (56,546.25) and H4 (56,591.84) as the primary intraday bull objectives.
Significant Gap (0.25–0.5%) — Balanced
A significant gap up of 0.25–0.5% opens BANKNIFTY near 56,500–56,640, thrusting price at or above PDH (56,497.45) and into R1 (56,546.25) and H4 (56,591.84) territory — a powerful but exhaustion-prone opening that requires careful validation before adding fresh longs. At this level, a 30-minute candle close above H4 (56,591.84) is the Narrow CPR confirmation rule, and failure to achieve this within the first 30 minutes after a significant gap suggests gap-fill risk back toward TC (56,334.30) or the H3 level (56,475.27). The upside path after confirmed 30-minute hold above H4 (56,591.84) targets R2 (56,733.80), H5 (56,727.99), and H6 (56,784.76), while the monthly max pain at 57,200 provides the broader directional gravity that makes this gap-up scenario structurally valid.
Large Gap (>0.5%) — Gap Direction Dominant
A large gap up exceeding 0.5% opens BANKNIFTY above 56,640, well beyond H4 (56,591.84) and approaching R2 (56,733.80) and H5 (56,727.99) — an extreme opening that invites immediate profit-taking and mean-reversion selling from option premium sellers. Two consecutive 30-minute closes above H4 (56,591.84) are required by the Wide confirmation rule to validate continuation, and without this confirmation, the high probability trade is a fade toward H3 (56,475.27) and then TC (56,334.30). The OI resistance at 58,000 remains 1,641+ points above such a large gap-up open, confirming there is significant headroom for bulls if momentum sustains, but the straddle's upper boundary near 57,346 represents the options market's expectation of maximum extension.
|
▲ Upside Path → OI-R From TC (56,334.30), the bull path progresses to H3 (56,475.27) as the Camarilla first stall zone for partial profit-taking, then PDH (56,497.45) as the prior session resistance that must be cleared to confirm trend resumption, followed by R1 (56,546.25) and H4 (56,591.84) as the dual Traditional and Camarilla breakout triggers. Sustained volume expansion through H4 (56,591.84) would unlock R2 (56,733.80), H5 (56,727.99), and H6 (56,784.76), with the monthly max pain at 57,200 and OI resistance at 58,000 providing the structural context for how far the bull run can extend over multiple sessions. |
▼ Downside Path → OI-S If BANKNIFTY fails to hold TC (56,334.30) on a gap-up day, the reversal path drops through P (56,309.90), BC (56,285.50), and then L3 (56,242.13) — the Camarilla bear zone that would signal a bull-trap gap-up and attract aggressive short-sellers. Further below L3 (56,242.13), L4 (56,125.56) and S1 (56,122.35) form a dual support cluster near PDL (56,073.55), representing the extreme downside for a failed gap-up day, while OI support at 54,000 remains a distant floor that would only be relevant in a catastrophic session. |
| 🔴 OI-R: OI resistance at 58,000 (highest CE OI for the month) sits 1,641 points above Friday's close and functions as the ultimate structural ceiling for BANKNIFTY's bull campaign in September 2026 — CE writers at the 58,000 strike are confident that this level will not be breached this month, and their premium collection creates a natural gravitational resistance. On a gap-up day, the 58,000 OI wall acts as the maximum aspiration target for the most aggressive bull positions, but the more practical intraday resistance is the H4/R1 zone at 56,546–56,591 where intraday CE writing will concentrate. | 🟢 OI-S: OI support at 54,000 (highest PE OI for the month) is 2,358 points below the current price and is entirely irrelevant for intraday purposes on a gap-up day — PE writers at this strike are deeply out of the money and their delta-hedging activity does not impact near-term price action. The relevant near-term PE support is concentrated around the 56,000–56,200 zone based on weekly option positioning, making PDL (56,073.55) and L4 (56,125.56) the practical intraday downside floors rather than the distant monthly OI-S at 54,000. |
⚡ Key Trigger: Primary trigger for gap-up continuation is a first 15-minute candle close above PDH (56,497.45) — the prior session high that represents the most recent resistance level where sellers previously stepped in. Since the previous close (56,358.70) was already above TC (56,334.30), the first 15-minute close above PDH (56,497.45) is the definitive confirmation that a trend-continuation day is underway, targeting H3 (56,475.27), R1 (56,546.25), and H4 (56,591.84) in rapid sequence; failure to reclaim PDH and a first candle close below TC (56,334.30) triggers a reversal scenario targeting P (56,309.90) and BC (56,285.50).
▼ Lower Open (Gap Down) — Open < Prev Close
▼ Bearish
Open lands: Since BANKNIFTY's previous close (56,358.70) is above TC (56,334.30), a gap-down open below 56,358.70 but above TC (56,334.30) would still keep price inside the CPR band's upper range — a minor gap. A meaningful gap down below TC (56,334.30) places price inside the CPR band, and a gap below BC (56,285.50) places price below the entire overlapping CPR, which is the most bearish opening configuration. Price below BC (56,285.50) on an Overlapping CPR where the previous close was above TC represents a sharp bearish inversion.
CPR role: Overhead resistance — a gap-down open below TC (56,334.30) turns the CPR band (BC 56,285.50 to TC 56,334.30) into immediate overhead resistance. Bulls must first reclaim TC (56,334.30) and then sustain above BC (56,285.50) to neutralise the gap-down pressure; until TC is reclaimed, every bounce toward the band should be treated as a short-selling opportunity in a bearish gap-down session.
Minor Gap (0.05–0.25%) — Structure Dominant
A minor gap down of 0.05–0.25% opens BANKNIFTY in the 56,217–56,330 range, placing price either inside the CPR band (between BC 56,285.50 and TC 56,334.30) or just below BC (56,285.50) — a nuanced opening where the gap is small enough that gap-fill back to the previous close (56,358.70) is achievable within the first 30–60 minutes. The Narrow CPR (0.09%) with first 15-minute confirmation rule means that a close back above TC (56,334.30) on the first candle restores bullish control targeting PDH (56,497.45) and H3 (56,475.27), while a close below BC (56,285.50) confirms the gap-down's bearish intent and routes price toward L3 (56,242.13) and PDL (56,073.55). The previous close being above TC (56,334.30) gives the bull case added structural support — two sessions above TC followed by a minor gap-down is often absorbed by the underlying trend, making the buy-the-dip approach valid with a stop below BC (56,285.50).
Significant Gap (0.25–0.5%) — Balanced
A significant gap down of 0.25–0.5% opens BANKNIFTY near 56,217–56,217, placing price below BC (56,285.50) and approaching L3 (56,242.13) — a structurally compromised opening that questions the Overlapping Narrow CPR's bullish trend structure. The 30-minute candle close rule applies: bulls must reclaim BC (56,285.50) within 30 minutes to argue gap-fill toward TC (56,334.30) and beyond, while failure to do so within 30 minutes confirms bears are absorbing the trending structure and activates the L3 (56,242.13), L4 (56,125.56), S1 (56,122.35) bear pathway. The monthly max pain at 57,200 provides strong fundamental justification for bulls to defend here — at 56,200 or below, BANKNIFTY is 1,000 points below max pain, creating significant incentive for option sellers to step in as buyers.
Large Gap (>0.5%) — Gap Direction Dominant
A large gap down exceeding 0.5% opens BANKNIFTY below 56,076, at or below PDL (56,073.55) — a session-opening disaster for bulls that breaches the previous session's entire range from the very first trade. At this level, the Camarilla bear targets of L4 (56,125.56) and L5 (55,989.41) are immediately in play, while the straddle's lower boundary near 55,454 defines the options market's worst-case expectation for the monthly expiry. Two consecutive 30-minute closes below L4 (56,125.56) confirm the large-gap bear extension targeting L5 (55,989.41), S2 (55,886.00), and L6 (55,932.64), while recovery requires a recapture of both PDL (56,073.55) and BC (56,285.50) in sequence — an extremely tall order in a large-gap-down environment.
|
▲ Upside Path → OI-R Bull recovery path: BC (56,285.50) must be reclaimed first on a 30-minute close, then P (56,309.90) as the pivot midpoint, then TC (56,334.30) to restore the bullish above-CPR positioning, and then PDH (56,497.45) via H3 (56,475.27) as the full gap-fill and trend-resumption target. Volume expansion through TC (56,334.30) is the confirmation signal that distinguishes a genuine recovery from a short-covering bounce — without volume expansion, price is likely to stall at TC (56,334.30) and reverse lower. |
▼ Downside Path → OI-S Bear extension path from below BC (56,285.50): L3 (56,242.13) is the first Camarilla stall zone for partial profits on short positions, followed by PDL (56,073.55) which aligns closely with S1 (56,122.35) and L4 (56,125.56) as the triple support cluster. A 15-minute close below L4 (56,125.56) triggers stop-loss cascades and targets L5 (55,989.41), S2 (55,886.00), L6 (55,932.64), and ultimately S3 (55,698.45) in a full bear-extension session — PUT writing at the 56,000 level will face rapid unwinding pressure if L4 fails. |
| 🔴 OI-R: OI resistance at 58,000 on the CE side is the overhead structural ceiling that makes any gap-down recovery rally appear shallow by comparison — even a full recovery to the previous close (56,358.70) leaves BANKNIFTY 1,641 points below OI resistance, confirming that the bear pressure is entirely intraday in nature and not a structural breakdown of the bull trend. CE writers at 58,000 are comfortable with their positions at all gap-down levels below 56,500 and will not meaningfully interfere with intraday bear momentum. | 🟢 OI-S: OI support at 54,000 (highest monthly PE OI) is far below any intraday gap-down scenario and serves primarily as a psychological reminder that the options market's structural floor is vastly below current prices — PE writers at 54,000 are deep out of the money and their activity does not provide meaningful near-term intraday support. The practical intraday PE support is concentrated around the 56,000–56,200 zone based on near-term positioning, making L4 (56,125.56) and S1 (56,122.35) the real intraday support cluster that PE writers at near-ATM strikes will defend. |
⚡ Key Trigger: The critical trigger for gap-down sessions in BANKNIFTY is whether BC (56,285.50) can be reclaimed within the first 30 minutes using a 30-minute candle close — a successful reclaim above BC confirms the Overlapping CPR is still providing demand support and that the gap was a temporary dislocation rather than a trend reversal. Failure to reclaim BC (56,285.50) within 30 minutes activates the bear thesis with L3 (56,242.13) as the first target, L4 (56,125.56) as the breakdown trigger, and PDL (56,073.55) as the session's downside anchor — both the bull reclaim and bear confirmation are equally high-probability outcomes in an Overlapping CPR, making the 30-minute close the only reliable trade signal.
◆ Near Flat Open — Open ≈ Prev Close (±0.05%)
◆ Neutral
Open lands: A flat open within ±0.05% of the previous close of 56,358.70 places BANKNIFTY in the 56,330–56,387 range. Given TC is 56,334.30, a flat open of 56,330–56,387 lands at or just above TC — with the most likely flat-open scenario placing price right at TC (56,334.30) or fractionally above it. This is technically an above-TC open given the previous close of 56,358.70 is already 24.40 points above TC, confirming the bullish above-CPR positioning from Friday is maintained at the flat open.
CPR role: Support base and decision zone — with a flat open near TC (56,334.30) on an Overlapping Narrow CPR where the previous close was above TC, the CPR band acts as an immediate demand zone. The Narrow width (0.09%, spanning 48.80 points from BC 56,285.50 to TC 56,334.30) creates a compact but decisive support structure — the first 15-minute candle will determine whether this support activates the bull trend or breaks down into a bearish session.
Near Flat (±0.05%)
A flat open near TC (56,334.30) on BANKNIFTY's Overlapping Narrow CPR is an extremely high-information setup — because the previous close (56,358.70) was already above TC, a flat open that pulls price back to TC represents a test of the CPR band as support, and the first 15-minute candle close determines whether this support holds or fails. The Narrow CPR width of 0.09% (48.80 points) combined with the Trending market structure designation creates the ideal conditions for a trending day — flat opens on narrow ascending or overlapping trending CPRs have high trending-day probability, and intraday range-trading strategies should be avoided in favor of directional bias after the first candle signal. Bull trigger is a first 15-minute close back above previous close (56,358.70) and PDH zone — this confirms the above-TC positioning is sustained and targets H3 (56,475.27), PDH (56,497.45), and R1 (56,546.25) as the day's bull path; Bear trigger is a first 15-minute close below BC (56,285.50), which confirms the CPR band has failed as support and locks in bearish control targeting L3 (56,242.13) and PDL (56,073.55). The monthly max pain at 57,200 — 841 points above the current close — provides a powerful gravitational pull toward higher levels that makes the bullish flat-open scenario structurally more probable, as option sellers benefit from BANKNIFTY drifting toward 57,200 over the coming sessions.
|
▲ Upside Path → OI-R From a 15-minute close above TC (56,334.30), the bull path progresses to H3 (56,475.27) as the Camarilla stall zone for first partial profits, then PDH (56,497.45) as the prior session high, and then R1 (56,546.25) and H4 (56,591.84) as the dual breakout triggers — all of which align with the monthly max pain gravity at 57,200 that supports the bull case. Volume confirmation at each Camarilla level is essential — a stall at H3 (56,475.27) with declining volume signals a scalp-profit exit, while expanding volume through PDH (56,497.45) and R1 (56,546.25) confirms a full trend-day move toward H5 (56,727.99) and R2 (56,733.80). |
▼ Downside Path → OI-S A 15-minute close below BC (56,285.50) activates the downside path through L3 (56,242.13) as the Camarilla first stall zone — short positions initiated at BC should take 30% profits at L3 (56,242.13) — then through L4 (56,125.56) and S1 (56,122.35) which form the dual Camarilla-Traditional breakdown cluster near PDL (56,073.55). A break below L4 (56,125.56) targets L5 (55,989.41), S2 (55,886.00), and L6 (55,932.64) as the extended bear targets, with the straddle's lower boundary near 55,454 defining the options market's downside expectation ceiling. |
| 🔴 OI-R: OI resistance at 58,000 (highest CE OI for the month) creates a structural ceiling that CE writers are aggressively defending through premium collection — on a flat-open day, this distant wall functions as the maximum bull aspiration for the monthly series and ensures that any intraday rally will face incremental CE writing pressure at each Camarilla resistance level (H3 56,475.27, H4 56,591.84, R2 56,733.80) long before the 58,000 OI wall is reached. The practical effect is that intraday bull momentum will encounter layered CE selling resistance well below 58,000, making partial profit-taking at each Camarilla level the prudent strategy rather than running positions all the way to OI resistance. | 🟢 OI-S: OI support at 54,000 (highest PE OI for the month) is 2,358 points below the current price and irrelevant for intraday flat-open trading — it represents the structural monthly floor that PUT writers are defending over the longer term and does not create meaningful gamma-hedging demand at current price levels. For a flat-open scenario near TC (56,334.30), the near-term PE protection is concentrated around the 56,000–56,200 area (estimated from weekly option activity), making PDL (56,073.55) and L4 (56,125.56) the practical intraday support cluster that near-ATM PUT writers will defend with delta-hedging activity. |
⚡ Key Trigger: Bull trigger: first 15-minute candle close above TC (56,334.30) and holding near the previous close of 56,358.70 confirms above-CPR bullish positioning is maintained, targeting H3 (56,475.27) and then PDH (56,497.45); Bear trigger: first 15-minute candle close below BC (56,285.50) confirms CPR band has failed as support, activating the downside path toward L3 (56,242.13) and L4 (56,125.56). The Narrow width of 0.09% ensures that the 48.80-point band between BC and TC is crossed quickly and decisively — there is no meaningful zone of indecision in this CPR configuration, making the 15-minute close signal highly reliable for the session's direction.
SENSEX
Overlapping — Medium (Width 0.19%)
↕ Conflicted
Market Structure Balanced or transitional | Straddle ATM 74,300 straddle (weekly and monthly combined) priced at 858.05 points (Call 588.00 + Put 270.05), implying an expected move of approximately ±858 points from ATM, defining a range of roughly 73,442 to 75,158 for the session. The significant asymmetry between call premium (588.00) and put premium (270.05) — calls priced at 2.18x puts — reflects a strong upside volatility skew and suggests option buyers are paying a substantial premium for upside coverage while puts are relatively cheap, indicating either complacency about downside or strong institutional hedging above current levels. | Max Pain Weekly and monthly max pain both at 74,600, sitting 305 points above Friday's close of 74,294.96 — this convergence of weekly and monthly max pain at the same strike creates an extremely powerful gravitational force toward 74,600 for both the 24 Sep weekly and monthly expiry. The practical implication is that option sellers on both series benefit from SENSEX drifting toward 74,600, making intraday declines toward 73,900–74,100 likely to be bought and intraday rallies toward 74,700–74,900 likely to be faded. |
Tomorrow's Complete Level Map
OI-R: 74,500 R3: 75,017.42 H6: 74,728.44 H5: 74,672.60 R2: 74,872.93 H4 ▶: 74,533.37 R1: 74,583.94 PDH: 74,728.44 H3 ↩: 74,414.17
TC: 74,511.70 P: 74,439.45 BC: 74,367.20
L3 ↩: 74,175.75 PDL: 74,294.96 S1: 74,150.46 L4 ▶: 74,056.55 S2: 74,005.97 L5: 73,917.32 L6: 73,861.48 S3: 73,716.98 OI-S: 68,000
↩ = Camarilla reversal point | ▶ = Camarilla breakout/breakdown trigger | OI-R/OI-S = Options wall (CE/PE max OI)
▲ Higher Open (Gap Up) — Open > Prev Close
▲ Bullish
Open lands: SENSEX's Overlapping Medium CPR has BC at 74,367.20 and TC at 74,511.70, with the previous close (PDC) of 74,294.96 sitting BELOW BC (74,367.20). This means a flat open near 74,294.96 is already below the entire CPR band — a gap-up open above 74,294.96 but below BC (74,367.20) is still below the CPR. A minor gap-up opens near 74,332–74,481 (inside the CPR band); a significant gap-up opens near 74,481–74,665 (within or just above TC 74,511.70); a large gap-up opens above 74,665, above TC and potentially above OI resistance at 74,500.
CPR role: Resistance-to-support transition zone — the Medium Overlapping CPR (BC 74,367.20 to TC 74,511.70) acts as overhead resistance for a price opening below BC, but once BC is cleared, the band transitions to support and becomes a launch pad toward TC (74,511.70) and the OI resistance at 74,500. The 0.19% width (144.50 points) requires a 30-minute candle close above BC (74,367.20) to confirm the bullish breakout from the band.
Minor Gap (0.05–0.25%) — Structure Dominant
A minor gap up of 0.05–0.25% opens SENSEX in the 74,332–74,481 range, placing price inside the CPR band between BC (74,367.20) and TC (74,511.70) — a structurally ambiguous opening where the Medium CPR width requires 30-minute confirmation before directional commitment. The CPR band (144.50 points wide) means price could oscillate within BC-to-TC range for the first 30–60 minutes, and the critical observation is that H3 (74,414.17) sits INSIDE the CPR band between BC and TC, creating a compressed triple-resistance zone that must be broken before bulls can target TC (74,511.70) and the OI resistance at 74,500. A 30-minute candle close above TC (74,511.70) is the bull trigger targeting R1 (74,583.94) and H5 (74,672.60), while failure below BC (74,367.20) on a 30-minute candle close reverts to the bearish below-CPR scenario with L3 (74,175.75) as the target.
Significant Gap (0.25–0.5%) — Balanced
A significant gap up of 0.25–0.5% opens SENSEX near 74,481–74,665, placing price inside the upper CPR band (between H3 74,414.17 and TC 74,511.70) or just above TC — a pivotal opening that immediately brings the critical OI resistance at 74,500 into play, since a significant gap up above TC (74,511.70) opens very close to or above the 74,500 CE OI wall. At this opening level, the combination of the TC resistance (74,511.70), OI resistance (74,500), and H4 (74,533.37) creates an extremely dense resistance cluster within a 33-point band that will be fiercely contested by CE writers — a 30-minute sustained hold above H4 (74,533.37) with OI resistance cleared would be a powerful signal targeting H5 (74,672.60), H6 (74,728.44), and R1 (74,583.94). Max pain at 74,600 is within the straddle's upper range from this opening, making the 74,550–74,650 zone the dominant bull target for a significant gap-up day.
Large Gap (>0.5%) — Gap Direction Dominant
A large gap up exceeding 0.5% opens SENSEX above 74,665, clearing OI resistance (74,500), TC (74,511.70), H4 (74,533.37), and approaching H5 (74,672.60) and PDH (74,728.44)/H6 (74,728.44) — a historic-momentum opening that carries high gap-fill risk in the Medium CPR environment. Two consecutive 30-minute closes above H4 (74,533.37) are required under the Medium CPR confirmation rule, but the immediate risk is that price opens directly into the H5-H6-PDH cluster (74,672.60–74,728.44), where sellers from the previous session high will be active from the very first minute. R1 (74,583.94) and R2 (74,872.93) are the bull targets beyond this zone, while a fade back below OI resistance (74,500) and TC (74,511.70) would confirm a bull trap and target the CPR midpoint at P (74,439.45) and BC (74,367.20) as gap-fill destinations.
|
▲ Upside Path → OI-R From a confirmed 30-minute close above TC (74,511.70), the upside path progresses through H4 (74,533.37) — the Camarilla breakout trigger just 21.67 points above TC — then to the max pain zone at 74,600, followed by H5 (74,672.60) and PDH/H6 at 74,728.44 as the Camarilla upper target zone. Volume must expand decisively at H4 (74,533.37) to confirm genuine breakout rather than a short-squeeze bounce — without volume expansion, profit-taking at max pain (74,600) is the prudent strategy, while R1 (74,583.94) and R2 (74,872.93) represent the Traditional secondary targets for a full bull trending day. |
▼ Downside Path → OI-S Failure to hold BC (74,367.20) after a gap-up reversal routes SENSEX through L3 (74,175.75) as the Camarilla first stall zone, then S1 (74,150.46) as the Traditional first support, and then L4 (74,056.55) and S2 (74,005.97) as the dual Medium CPR breakdown cluster. A 30-minute close below L4 (74,056.55) confirms a full reversal and targets L5 (73,917.32), L6 (73,861.48), and S3 (73,716.98) — the OI support at 68,000 is so distant that it provides no practical intraday floor, making the Camarilla L4-L6 zone the only meaningful downside support structure for the session. |
| 🔴 OI-R: OI resistance at 74,500 (highest CE OI for both the week and month) is the single most critical level in SENSEX analysis for 21 Sep 2026 — it sits only 11.70 points below TC (74,511.70), creating an extraordinary confluence where the Technical CPR resistance and the Options OI wall are essentially at the same level. CE writers at 74,500 are aggressively defending this strike for both weekly (24 Sep) and monthly (24 Sep) expiry, meaning a sustained close above 74,500 would trigger significant delta-hedging buying from CE sellers and accelerate the move toward 74,600–74,728, while a rejection at 74,500 confirms the option seller's dominance and routes price lower. | 🟢 OI-S: OI support at 68,000 (highest PE OI for both week and month) is 6,294.96 points below Friday's close — an astronomically distant floor that is entirely irrelevant for intraday price action and reflects that PUT writers are protecting extreme tail-risk scenarios rather than near-term downside. The practical intraday downside protection comes from the Camarilla L3–L4 zone (74,056.55–74,175.75) and S1 (74,150.46), where near-ATM PUT writers will provide delta-hedging buying support, making these levels the real intraday floors regardless of the distant OI-S at 68,000. |
⚡ Key Trigger: Primary trigger for a gap-up session in SENSEX is a 30-minute candle close above TC (74,511.70) AND OI resistance (74,500) simultaneously — since TC (74,511.70) and OI resistance (74,500) are separated by only 11.70 points, clearing both on a 30-minute close is the definitive bull confirmation signal for the Medium CPR. A failure to achieve a 30-minute close above TC (74,511.70) after a gap-up open indicates that the gap is being sold aggressively by CE writers at 74,500, and the failure pattern reverts price toward BC (74,367.20) and then L3 (74,175.75) as the intraday bear targets.
▼ Lower Open (Gap Down) — Open < Prev Close
▼ Bearish
Open lands: Since SENSEX's previous close (74,294.96) is already below BC (74,367.20), a gap-down open further below 74,294.96 places price even further below the entire Overlapping Medium CPR band. A minor gap down opens near 74,146–74,257 (approaching S1 74,150.46 and L3 74,175.75); a significant gap down opens near 73,923–74,109 (at or below L4 74,056.55); a large gap down opens below 73,923, at L5 (73,917.32) or below.
CPR role: Overhead resistance — the entire CPR band from BC (74,367.20) to TC (74,511.70) sits well above the opening price in a gap-down scenario, acting as overhead resistance at two levels. Bulls must first reclaim BC (74,367.20) to even approach the CPR band, making a full gap-fill toward TC (74,511.70) an extremely ambitious target in a single session — the realistic bull recovery target is BC (74,367.20) recovery on a 30-minute close.
Minor Gap (0.05–0.25%) — Structure Dominant
A minor gap down of 0.05–0.25% opens SENSEX near 74,109–74,257, placing price in the L3 (74,175.75) to S1 (74,150.46) zone and well below BC (74,367.20) — a structurally bearish opening that adds to Friday's already below-CPR close at 74,294.96 (which was itself below BC). Two consecutive sessions below BC on an Overlapping Medium CPR is a persistent bearish signal, and the 30-minute close rule requires a reclaim of BC (74,367.20) within the first 30 minutes to even begin discussing a bull recovery. If the gap-down level is near L3 (74,175.75), there may be a brief bounce as Camarilla mean-reversion buyers appear, but this bounce should be faded at BC (74,367.20) resistance rather than treated as a bull signal — the bear case targets L4 (74,056.55), S2 (74,005.97), and L5 (73,917.32).
Significant Gap (0.25–0.5%) — Balanced
A significant gap down of 0.25–0.5% opens SENSEX near 73,923–74,109, at or near L4 (74,056.55) — a critical Camarilla breakdown level whose breach would be confirmed from the very opening of the session. At this level, the Medium CPR confirmation rule requires two consecutive 30-minute closes below L4 (74,056.55) to validate the bear extension, with S2 (74,005.97) as the first Traditional target and L5 (73,917.32) as the Camarilla downside target. The straddle's lower boundary near 73,442 becomes relevant for a significant gap-down day — bears opening near L4 can target S3 (73,716.98) as the extreme bear target, while any recovery must first clear L3 (74,175.75) and then BC (74,367.20) on a 30-minute close to reverse the bias.
Large Gap (>0.5%) — Gap Direction Dominant
A large gap down exceeding 0.5% opens SENSEX below 73,923, at or below L5 (73,917.32) — a catastrophic opening that would breach all practical intraday support levels simultaneously and open in the straddle's lower boundary zone. At this level, panic selling and forced liquidations dominate the first 30 minutes, and the bear recovery trade waits for two consecutive 30-minute closes back above L5 (73,917.32) before considering any long positions. The downside target from a large gap-down open extends to L6 (73,861.48) and S3 (73,716.98), with the OI support at 68,000 being too distant to provide any practical intraday relief — the Camarilla L5-L6 zone is the terminal bear target for such a session.
|
▲ Upside Path → OI-R Recovery path from a gap-down: S1 (74,150.46) and L3 (74,175.75) must first hold as intraday supports, then P (74,439.45) is the pivot midpoint target, followed by BC (74,367.20) — the most critical recovery level for the 30-minute close signal — and then the full CPR band recovery targets TC (74,511.70) and the 74,500 OI resistance zone. A 30-minute close above BC (74,367.20) with max pain at 74,600 and OI resistance at 74,500 acting as gravitational forces makes the 74,450–74,511 recovery zone the realistic bull target for a gap-down recovery day. |
▼ Downside Path → OI-S Bear extension path from below the CPR: L3 (74,175.75) and S1 (74,150.46) are the first Camarilla and Traditional stall zones where partial profits should be taken, followed by L4 (74,056.55) as the Camarilla breakdown trigger and S2 (74,005.97) as the dual confirmation breakdown level. A 30-minute close below L4 (74,056.55) and S2 (74,005.97) — which are separated by only 50.58 points — activates the terminal bear targets of L5 (73,917.32), L6 (73,861.48), and S3 (73,716.98), while the straddle's lower boundary near 73,442 provides the ultimate downside reference for a full trending bear day. |
| 🔴 OI-R: OI resistance at 74,500 (CE OI wall for both weekly and monthly expiry) sits approximately 205 points above the previous close and over 240 points above any minor gap-down open — on a gap-down day, this resistance acts as the ultimate ceiling for any recovery attempt, with CE writers at 74,500 having no incentive to unwind unless price approaches from below with sustained momentum. The dual-expiry CE OI wall at 74,500 creates an impenetrable overhead ceiling that makes the BC (74,367.20) the more realistic recovery target in a gap-down session, as reaching 74,500 would require a full gap-fill plus an additional 205-point rally. | 🟢 OI-S: OI support at 68,000 (PE OI wall for both weekly and monthly expiry) is so far below current price levels — 6,294.96 points — that it provides no meaningful intraday support function for any gap-down scenario. The actual near-term PE protection comes from near-ATM PUT writers at strikes around 74,000–74,200 (estimated from current positioning), making S2 (74,005.97) and L4 (74,056.55) the practical intraday PUT defense zones where delta-hedging buying will provide temporary support — the distant 68,000 OI support is a monthly tail-risk hedge rather than an intraday trading reference. |
⚡ Key Trigger: The critical trigger for gap-down SENSEX sessions is whether BC (74,367.20) can be reclaimed on a 30-minute candle close within the first 30 minutes — given the previous close (74,294.96) was already below BC, this requires a gap-fill of at least 72.24 points from the previous close, making it an ambitious but clearly defined bull recovery target. Failure to reclaim BC (74,367.20) within 30 minutes with two consecutive bearish 30-minute candles below L3 (74,175.75) confirms the Medium CPR's overhead resistance structure is fully active and initiates the L4 (74,056.55), S2 (74,005.97), and L5 (73,917.32) downside sequence.
◆ Near Flat Open — Open ≈ Prev Close (±0.05%)
◆ Neutral
Open lands: A flat open within ±0.05% of the previous close of 74,294.96 places SENSEX in the range of 74,257–74,332 — which is below BC (74,367.20) by a margin of 35–110 points. This means a flat open keeps SENSEX below the entire Overlapping Medium CPR band for a second consecutive session (Friday also closed at 74,294.96, which is below BC 74,367.20), creating a persistent below-CPR bearish signal that adds structural pressure to the session.
CPR role: Overhead resistance and decision zone — with a flat open below BC (74,367.20) on a Medium Overlapping CPR, the entire band (BC 74,367.20 to TC 74,511.70) acts as layered overhead resistance. The 0.19% width means two consecutive 30-minute closes are needed to confirm a breakout through TC, making the CPR band a formidable barrier — but the proximity to max pain at 74,600 (305 points above the open) creates a genuine gravitational pull that can draw price upward if buying pressure materialises.
Near Flat (±0.05%)
A flat open below BC (74,367.20) on SENSEX's Overlapping Medium CPR is a structurally important setup — price opening below the entire CPR band for the second consecutive session signals persistent below-CPR weakness, and the Medium confirmation rule (30-minute close) prevents premature directional entries. The CPR band spans 144.50 points from BC (74,367.20) to TC (74,511.70), and there are four distinct resistance levels stacked within and just above it: BC (74,367.20), H3 (74,414.17) — note that H3 sits inside the CPR band itself creating an unusual compression — P (74,439.45), and TC (74,511.70), followed immediately by OI resistance at 74,500 and H4 (74,533.37). The bull trigger for a flat-open scenario is a 30-minute candle close above BC (74,367.20), which initiates a CPR band penetration attempt targeting P (74,439.45), H3 (74,414.17) — despite H3 being inside the band, it will still act as a stall zone — and then TC (74,511.70); a clean two 30-minute close above TC (74,511.70) and OI resistance (74,500) would be the strongest signal of the session, targeting max pain at 74,600 and H5 (74,672.60). The bear trigger is a 30-minute close below L3 (74,175.75) which confirms that even the CPR's gravitational pull toward 74,600 cannot overcome the selling pressure, and activates downside targets of S1 (74,150.46), L4 (74,056.55), and S2 (74,005.97) — with the 'Balanced or transitional' market structure designation indicating that neither bulls nor bears have decisive control, making both directional outcomes equally probable from a flat open.
|
▲ Upside Path → OI-R The bull path from a flat open below BC progresses: first clearing BC (74,367.20) on a 30-minute close, then H3 (74,414.17) — which sits unusually inside the CPR band at 47 points above BC — then P (74,439.45) as the pivot midpoint, and finally TC (74,511.70) which, once cleared with two consecutive 30-minute closes, opens the path to OI resistance (74,500, which is technically below TC but the OI wall effect extends through the 74,500–74,534 zone), max pain (74,600), H5 (74,672.60), and H6 (74,728.44). Each level should be treated as a partial profit target given the Medium CPR's tendency toward retest behaviour before extending. |
▼ Downside Path → OI-S The bear path from a flat open below BC progresses through L3 (74,175.75) — the first Camarilla support for partial short profits — then S1 (74,150.46) as the Traditional first support level that aligns within 25 points of L3, forming a double support cluster. A 30-minute close below this L3-S1 cluster (74,150–74,175) activates L4 (74,056.55) and S2 (74,005.97) as the dual Medium CPR breakdown targets, with L5 (73,917.32) and L6 (73,861.48) as the extended Camarilla downside targets and S3 (73,716.98) as the Traditional terminal bear target — each level should receive partial profit-taking from short positions. |
| 🔴 OI-R: OI resistance at 74,500 (highest CE OI for both weekly and monthly expiry) is only 205 points above a flat open near 74,295 — on a flat-open day below BC (74,367.20), this OI wall functions as a powerful magnet that draws price upward through the CPR band if any buying pressure materialises, since max pain at 74,600 and OI resistance at 74,500 are in close proximity and both attract price gravity. However, CE writers at 74,500 will defend this level aggressively — a 30-minute close above TC (74,511.70) with OI resistance cleared at 74,500 would require exceptional buying volume that overcomes dual-expiry CE writer hedging activity. | 🟢 OI-S: OI support at 68,000 (highest PE OI for both weekly and monthly expiry) is 6,294.96 points below the flat open and provides zero practical intraday support — PE writers at 68,000 are hedging extreme tail-risk events and their delta is essentially zero at current price levels. For a flat-open scenario near 74,295, the only meaningful PE support comes from near-ATM PUT writers at strikes around 74,000–74,200, whose delta-hedging activity will create buying demand near S1 (74,150.46) and L3 (74,175.75) — these are the practical intraday support floors that need to be watched, not the distant 68,000 OI support level. |
⚡ Key Trigger: Bull trigger: a 30-minute candle close above BC (74,367.20) — 72.24 points above the flat open — confirms a CPR band penetration attempt and targets H3 (74,414.17), P (74,439.45), and TC (74,511.70) sequentially; Bear trigger: a 30-minute close below L3 (74,175.75) — 119.21 points below the flat open — confirms that the CPR's gravitational pull toward max pain (74,600) has failed and initiates the L4 (74,056.55) and S2 (74,005.97) downside sequence. The Medium CPR confirmation rule is non-negotiable here — a single 15-minute candle is insufficient for a 0.19%-wide band; two 30-minute closes in the same direction are needed to confirm TC breakout or L3 breakdown.
📊 VIX Insight: India VIX data is unavailable for this session, which creates an important analytical gap — without VIX, there is no direct measure of implied volatility and market fear to calibrate option premium expectations. In the absence of VIX, traders should use the straddle premiums as the primary volatility proxy: NIFTY weekly straddle at 172.7 points (±0.74% from ATM), BANKNIFTY monthly straddle at 946 points (±1.68% from ATM), and SENSEX straddle at 858.05 points (±1.15% from ATM) — these ranges define the option market's expectation for each index's maximum intraday extension. For 21 Sep 2026, traders should treat any move that approaches or breaches the straddle boundary as a high-probability mean-reversion setup rather than a trend-continuation trade, particularly given the weekly expiry on 22 Sep for NIFTY and 24 Sep for SENSEX where aggressive theta decay will compress actual realized moves.
Overall View:
All three indices enter 21 Sep 2026 with their closing prices below their respective daily CPR bands — NIFTY closed at 23,346.40 just above TC (23,343.56) but within Ascending structure, BANKNIFTY closed at 56,358.70 above TC (56,334.30) maintaining bull positioning, and SENSEX closed at 74,294.96 below BC (74,367.20) in a persistently below-CPR bearish stance — creating a divergent cross-index picture where NIFTY and BANKNIFTY lean bullish while SENSEX signals caution. The critical confluence to watch on Monday 21 Sep is the NIFTY OI support at 23,300 (less than 50 points below current close), the SENSEX OI resistance at 74,500 (205 points above its close), and the BANKNIFTY monthly max pain at 57,200 — these three OI anchors define the session's key battlegrounds and will drive delta-hedging flows that determine the day's direction. With the NIFTY weekly expiry just one session away on 22 Sep, expect aggressive time-decay pressure that pins NIFTY near max pain (23,350), and traders should prioritise the first 15-minute candle signal on NIFTY's Narrow Ascending CPR as the session's most reliable directional indicator.
All three indices enter 21 Sep 2026 with their closing prices below their respective daily CPR bands — NIFTY closed at 23,346.40 just above TC (23,343.56) but within Ascending structure, BANKNIFTY closed at 56,358.70 above TC (56,334.30) maintaining bull positioning, and SENSEX closed at 74,294.96 below BC (74,367.20) in a persistently below-CPR bearish stance — creating a divergent cross-index picture where NIFTY and BANKNIFTY lean bullish while SENSEX signals caution. The critical confluence to watch on Monday 21 Sep is the NIFTY OI support at 23,300 (less than 50 points below current close), the SENSEX OI resistance at 74,500 (205 points above its close), and the BANKNIFTY monthly max pain at 57,200 — these three OI anchors define the session's key battlegrounds and will drive delta-hedging flows that determine the day's direction. With the NIFTY weekly expiry just one session away on 22 Sep, expect aggressive time-decay pressure that pins NIFTY near max pain (23,350), and traders should prioritise the first 15-minute candle signal on NIFTY's Narrow Ascending CPR as the session's most reliable directional indicator.
Disclaimer: KRV Prime provides educational and informational content relating to financial markets. Articles, research, examples, charts, strategies and tools are provided for educational purposes and should not be interpreted as personalised investment advice or a guarantee of financial performance. Markets involve risk, including possible loss of capital. Past performance does not guarantee future results. KRV Prime is not a SEBI Registered Investment Adviser or Research Analyst.